A GPS Tracker Journey
105
33
<0.5%
15
CHECKPOINTS
FAILURE RATE
YEARS EXPERIENCE
COMPONENTS
Quality control is an ability not an attitude
1.Product design
2. Incoming Materials Inspection
3. SMT Production
4. Testing and Assembly Process
1. Product Design

1. Rock Zeng is a senior GPS tracker hardware engineer with 17+ years of professional experience.
2. One of five pioneer hardware engineers who can design GPS tracker in China mainland. Reliable, goal-oriented, strong motivation and great ambition.
3. Jan 2014 - May 2015, Vice General Manager at BOFAN Limited, PT series products and R&D team management.
4. Feb 2010 - Dec 2013, Hardware Manager at Meitrack Group, developed MVT/MT hot-selling models.

1.Vito Hu is a senior software engineer with 15+ years of professional experience.
2. Master of famous Hunan University. Effective working style, he is a devoted family man too.
3. Nov 2013 - Aug 2015, R&D Manager at BOFAN Limited. PT series models sourcing code and maintaining, R&D team management, project manager.
4. May 2011 - Oct 2013, Senior Software engineer at Meitrack Group, Sourcing code for Z1 model to meet China national standard project required by Ministry of Transport. Sourcing code for basic and advanced vehicle GPS tracker models too.
Hardware Design: Our hardware engineer leader Rock Zeng has rich experience since 2002, he is one of the pioneer GPS tracker hardware engineers in mainland China. Thanks to the past 17 years rich and dedicated GPS tracker design experiences, our hardware engineer team has achieved the ability to make excellent designs to avoid common concerns like PCB short circuit, components burning, signal interference, power supply fluctuation, etc. Additionally, based on the many years of using and device performance observation, our hardware team is very familiar with the GPS tracker components, this ability enables us to select the most suitable, original, famous brand and verified components. For example, our PCB is fireproof, can sustain high temperature up to 300-500 degree.
Firmware Design: The software team leader Vito Hu is a computer master graduated from the famous Hunan university. Since 2005 he has focused on the GPS tracker firmware for more than 15 years. Thanks to the past experiences involved in different GPS tracker models and projects, especially the experience of China national standard project organized by China transportation department, our software team has achieved the ability to design excellent firmware structure, effectively avoid common concerns such as firmware lost, firmware dead, flash error and features conflict, etc.
2. Incoming Materials Inspection
The GPS tracker is made up of about 105 components. Some core components like GSM module, GPS module, MCU are produced by robot and from big brand company, quality control is very good, the inspection percent is lower. Some components like wires, are mainly produced by hands, the inspection percent is higher. Specific main components inspection requirements are below depends on different type materials.
3. SMT Production

Step 1: Materials and BOM list checking. IQC check whether material’s model , specs and quantity meet the BOM (Bill of Material) sheet or not

Step 2: Electronic materials baking. Material like PCB, IC and module, need put inside oven to remove the possibility of damp. SMT production quality is obviously affected by damped materials.

Step 7: AOI Finished Product Inspection. After reflow soldering, use AOI machine to inspect the appearance, whether has such problem- missing solder, insufficient solder or cold solder.

Step 8: Hand Soldering. Some components can’t sustain high temperature, these need to be welded by soldering iron, like antenna connector, electrolytic capacitor, cable connector, etc.

Step 3: Solder Paste Printing. The temperature of solder paste is one of most important factors for faulty soldering. The solder paste has to store inside refrigerator, it require to unfreeze for at least 2 hours, then use mixer to mix for 3-5 minutes before printing.
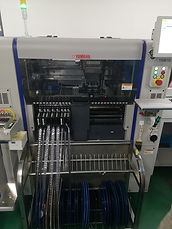
Step 4: SMT Patch. The patch program is set by machine

Step 5: PCBA Inspection. After SMT patch, QC inspects the material and the patch position is correct or not, this is one of checkpoints.

Step 6: Reflow Soldering. The material on PCB after SMT machine is not firm. After reflow soldering, the material will be fixed.


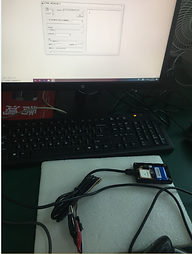
Step 7: Connect external power supply, make sure the red power light on PCB on
Step 8: test each checkpoint voltage, total 9 checkpoints. Make sure SIM card is detected, GPS, GSM, MCU working well, the external power and current value are normal.
Step 9: 82V aging testing for 4 hours.
Flash testing during aging testing.
Erase, read and write flash for 500 times

Step 18: Packing
4. Testing and Assemble Process


Step 1: PCBA ready from SMT production line
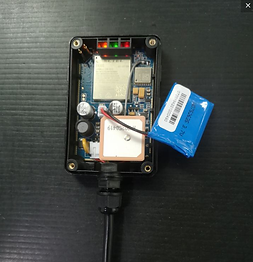
Step 2: Stick GPS antenna
Step 3: Loading testing firmware
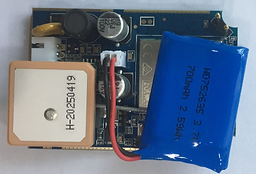


Step 4: Insert built-in batter
Step 5: Insert SIM card
Step 6: Press power key, make sure three Led lights on


Step 10: Repeat the 9 checkpoints voltage testing process
After aging testing.
Connect ext power 12.8-12.9V,
Current should be <=0.1A,
Red LED on PCBA should be on.
SIM card detected, GPS pass, GSM pass,
MCU pass, main power IC pass.
Step 11: Test current after power off. Remove battery, plug ampere meter to battery connector, the meter reading should be below 20uA
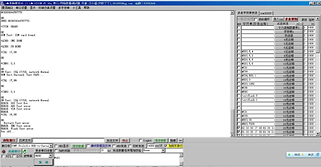
Step 12: Use SSCOM tool to test these
Functions- Input/output, AD ,ext power, battery, flash, GPS, GSM signal, USB and RS232 port


Step 15: Stick the battery
Put waterproof rubber ring for
IP66 Waterproof feature
Step 16: Assemble the case
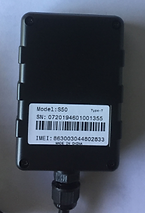
Step 17: Stick label, record SN and IMEI